 |
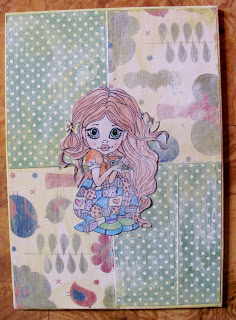
| Here's a page of Kiely sunbathing on the front porch. For the title I used the George and Basic Shapes Cricut cartridge. I used a circle punch for the sun in the corner. I used Create a Critter for the butterfly and a journaling tag for the journaling on the side. The background is some blue dotted cardstock I have. |
Friday, June 28, 2013
Kiely in the Sun
Hey everyone. I have another page from Kiely's book to share today. Here it is:
That's all I have for today. I'll be back on Monday with another OWH card. Until then TTFN Ta ta for now.
Thursday, June 27, 2013
Gary Again with Some YouTubing
Welcome all to another Scrapbook Thursday. I have Gary Allan concert #3 to share with you today.
Also, as promised, I made a video for the contest I've been working on. I've uploaded it to YouTube so I'm going to post it here to so you can see everything together. I did use a different set of macaroons since I wasn't very happy with the set I made for the contest.
Hope you enjoyed. I have one more concert to scrapbook for until I go to my next one next month. So next week I'll have Gary Allan concert #4 for you hopefully if I can get some pictures printed from it. Tomorrow will be Smashbook/Mini Album day and I'll be sharing another page from my puppy book. Until then, TTFN Ta ta for now.
 |
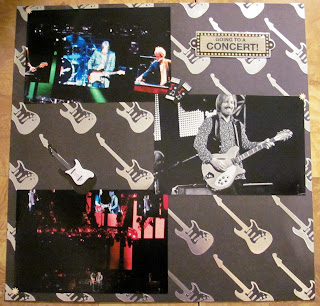
| On the left page are the opening acts for Gary. It was Thompson Square and Kellie Pickler! None of us were fans of Thompson Square live but Kellie Pickler was great. We were really close to the stage too. I was able to stand up on my chair and wave to Kellie and she waved back. It was so exciting. I included a picture of both of the opening acts along with my usual journaling block and the badge I got for having reserved seating. I'd convinced my Mom to join the Gary Allan Fan Club and that's how we got good seats and the badges. |
 |
| On the right page, I have a picture of Gary and a picture of my nephew. It was his first concert and he had a blast. Even got the cowboy hat there. I also included the ticket, wristband, and an extra embellishment. The heart is made using a Tim Holtz Sizzix die. I distressed it using Tattered Rose for the inside of the heart, Vintage Photo for the crown, and Black Staz On for the wings. |
Hope you enjoyed. I have one more concert to scrapbook for until I go to my next one next month. So next week I'll have Gary Allan concert #4 for you hopefully if I can get some pictures printed from it. Tomorrow will be Smashbook/Mini Album day and I'll be sharing another page from my puppy book. Until then, TTFN Ta ta for now.
Wednesday, June 26, 2013
Disney Love!
Hey everyone. Today is clay day and I have a few pieces to share. I have a piece for a swap, some for a contest, and one I made for fun. So away we go with the sharing.
I'll start with the contest pieces first.
Next I'll share the swap piece.
Lastly is the piece I made for fun and it is one of my favorite pieces I've made so far.
I hope you all liked the pieces I made. Like I said, I'll be making a video for the contest tomorrow and I'll post it on here along with my scrapbook page for Scrapbook Thursday. Until then TTFN Ta ta for now.
I'll start with the contest pieces first.
 |
| The first one is this Cutie Marie. I was originally going to make her whole body but it wasn't coming out right so I just did her head. I think she came out super cute though. My glaze is a little goopy so its kinda thick on her. |
 |
| I also made this donut for the contest. It's the last piece for the contest! I'll be making a video for it tomorrow so I'll post that on here as well as on my YouTube channel. This donut is based off of a squishy that I saw online and I really liked the design of it. This is also my first attempt at doing a donut that was bitten into. Ir looks like it was bitten to me. |
Next I'll share the swap piece.
 |
| I made this chibi for a Harry Potter swap I'm in on Craftster. Participants have to make their partner one Harry Potter thing that is no more than 4 inches. My partner is a Ravenclaw so she wanted something that was house specific. The only Ravenclaw I know of is Luna so I made this chibi of Luna in her school robes. I'll also be sending her in a box I made that is the house colors. |
 |
| This is a Mickey Mouse donut. It's very textured on the donut part and then I gave it some red frosting for pants and the yellow for Mickey's buttons. I actually copied this from a Re-ment that I found online. My version looks just like the picture. |
Tuesday, June 25, 2013
Lots of Swaps!
Hey everyone. Today I'm going to be sharing all the swaps that I have received and made this last week. There are a bunch of them. I'll start with the swaps I have made since there aren't as many of those.
I have also finished the DVD case. To recap, here's the cover:

Now to the inside. It's similar to the outside only without the girl and ribbon.
That's it for the stuff I made. I did make one more thing for swaps but it's not done yet so I'll show it tomorrow since it's clay. Alright so now onto the things i received.
Lastly, I received another Craftster swap so it's pretty big. I got my shrines from my partner so I have some photos of those to share with you. The topics that she chose for me are pandas and steampunk. So onto the shrines.
 This is the panda shrine. On the cover is this adorable panda eating bamboo. The panda is fuzzy and so soft. I love to pet it. There's also the cherry blossom sticker (I love cherry blossoms) and the Chinese script that looks like it is handwritten. I don't think I could write Chinese script. It's more detailed than Japanese and she did a great job with it.
 On the inside of the cover is a super cute panda charm with more cherry blossoms and some grass for the panda to play in. On the inside of the shrine is another fuzzy panda resting on a log in some more grass. There are some bamboo stalks too behind the metal leafy frill. This whole shrine is so cute and very me. I love pandas so anything with pandas melts my heart.
 Here's the steampunk shrine. The cover is simple but very neat. It's covered with the gear paper and has a big, thick key glued to it. The gears on the paper are glossy so it looks really cool in person.
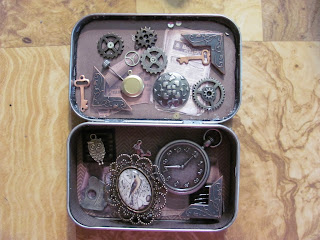 The inside of the shrine is so busy. On the inside of the cover, there are a bunch of gears, keys, photo corners, a big metal button, a clock winder, and a locket that opens. Behind everything are some old looking mini newspapers. The inside of the shrine has a lot of things too that are really popped up. There is a cute little owl, a key, a little bird charm, beautiful bird pendant, a pocket watch, more photo corners, and some more newspapers behind everything. This shrine is so cool.
That's everything I have to share for this week's swap share. Sorry it's a little long but I tend to sign up for a lot of swaps. Tomorrow I'll be sharing some clay pieces so for today TTFN Ta ta for now.
 |
| I only made thee ATCs this week. The first one is Jack Skellington for a Nightmare Before Christmas swap. It's a new series that is going to have swaps for all the characters. I already have an idea for Sally when it starts. The next ATC is for a red, white, and blue swap. My flag came out a little wonky. The last ATC is for a Around the World series. This swap is for Japan. I made a pagoda, put a sun in the corner, created some cherry blossoms, and put "love" and "Japan" in Japanese characters. |

Now to the inside. It's similar to the outside only without the girl and ribbon.
 |
| I used the same stamps and ink for the inside of the DVD case. I had to do a lot of circle cutting for the right side of the case. I painted the plastic parts that are showing with lavender paint. I used some washi tape to border the top and bottom of the right side. On the left, I created a big flower that has a blue button in the center. I also painted those tabs. I didn't put anything too close to the tabs so that my partner can put stuff in it. |
 |
| First, I received my Y art journal page. She made her using the word yellow. That's neat since yellow is my favorite color. I'm working on X right now so I should be able to share that with you next week on swap share day. |
 |
| I also have received my "Faces in the Crowd" ATC. My partner made this beautiful ATC that is a tribute to all those lost in Sandy Hook. It's gorgeous and I'm very honored to have been the one to receive it. For the swap, we were to send two ATCs so since this is the only one she sent she says she will be sending me another one. I'm sure it will be as beautiful as this one. |
 |
| I also got my Mermaid Art Doll. She is so neat. I love the bling on her tail and the seaweed on her waist. She's holding some shells in her hands and has a seahorse in her hair. The crown is also neat. Makes her look like an underwater princess. Love this doll so much. |
 This is the panda shrine. On the cover is this adorable panda eating bamboo. The panda is fuzzy and so soft. I love to pet it. There's also the cherry blossom sticker (I love cherry blossoms) and the Chinese script that looks like it is handwritten. I don't think I could write Chinese script. It's more detailed than Japanese and she did a great job with it.


That's everything I have to share for this week's swap share. Sorry it's a little long but I tend to sign up for a lot of swaps. Tomorrow I'll be sharing some clay pieces so for today TTFN Ta ta for now.
Monday, June 24, 2013
One Sketch, Two Cards
Hey everyone. It's Monday again so I'm sharing another card. This weeks OWH sketch is Sketch #178. It was a really fun sketch to use so I made cards with it.
I hope you all liked these two cards. Both are without sentiments so they can be used for any occasion. I'll be sharing some swaps tomorrow. I have lots to share. Until then TTFN Ta ta for now.
 |
| Here's the first card. I printed a bunch of digital stamps that I found online and colored them in with colored pencils and markers. This one is using Sharpies. I didn't put on a sentiment so that it can be used for any occasion. I used red, white, and blue cardstock. The patterned paper with the stars is from DCWV's All About Boys stack. I'm not sure where the dark red paper or the brads are from. |
 |
| For the second card, I used black, orange, green, and white cardstock. I used black Staz On to distress the white cardstock. I also used a Martha Stewart Stamp and some Tim Holtz Picket Fence distress ink to put the spiderwebs on the black cardstock. The cute bat is from Creative Cuties blog. I colored her in with colored pencils and there are also two blue brads on the side. |
Friday, June 21, 2013
These Are a Few of My Favorite Things to Do
Hey everyone. As promised, I'll show you some more pages from my Smashbook. I finished one page and made a new two page spread. It's my first in my book so I'm super excited about it. I'll start with the one I finished up today.
Now, onto my new two page spread!
I had so much fun putting these two pages together. I don't usually make things so busy but it is a Smashbook so I thought I'd give it a try. I got the idea for these pages on Pinterest. I created a board of different Smash page ideas so you can go check it out and maybe get some ideas for your own Smashbook. I out a bunch of challenges and pages on it so you'll probably see more of those coming soon in my own book. Hope everyone has a great weekend. I'll be back on Monday with an OWH card. TTFN Ta ta for now.
 |
| Here's the cat page I showed a couple weeks ago but I added some new things to it so I think it's complete now. I found a stamped image of a cat with a bee that I colored with my colored pencils, fussy cut both the cat and the bee out, and glued them on. I also added a flight path for the bee and added "Bzzzzz" that is coming from the bee. I also added some sound that my cats make under the word "Cat". If I find some more things that will fit on this page, I may add them later but until then, this is what the page looks like. |
 |
| This is the first page. It has the images that correspond with the page on the right. The title of the page is "Top 6 Hobbies". I drew that in with the Smash pen and then colored it in with my markers. I added an EK Success die cut to the bottom that says "I'm Creative. You Can't expect me to be clean too!" I thought that was very fitting for the way I craft. |
 |
| Here's the other side. I used one of the Smash pockets to put my little journaling blocks in. Each of the blocks have a different hobby that i like to do. I would have done 10 hobbies but I only had 6 of those journaling blocks. On the bottom right corner of each of the blocks is an owl that is the same color as the border around the block. I got them in a swap so I don't know who makes them. If anyone knows where I can get some more, let me know cause they are really cute. To keep all the blocks from moving, I put some washi tape on paperclips and clipped them onto the blocks. I added two extras on the bottombut those ones don't stand out as much. I decorated the pocket with washi tape, foam stickers, flowers, and a smash label. I added the date after this picture was taken. The two red hearts have faces and the pink heart has black dots in it with some lines coming off it. |
Thursday, June 20, 2013
Another Gary Allan concert
Hey everyone. Today is Scrapbook day again so I have another two page spread from a concert that I attended. It's Gary Allan concert #2. I've been to 4 so far so I'll be showing those in the upcoming weeks. So onto the pages.
Those are my two scrapbook pages for this week. I'll have Gary Allan concert #3 next week. That one is my favorite Gary concert so far. Tomorrow I'll be making another page for my Smashbook. So, TTFN Ta ta for now.
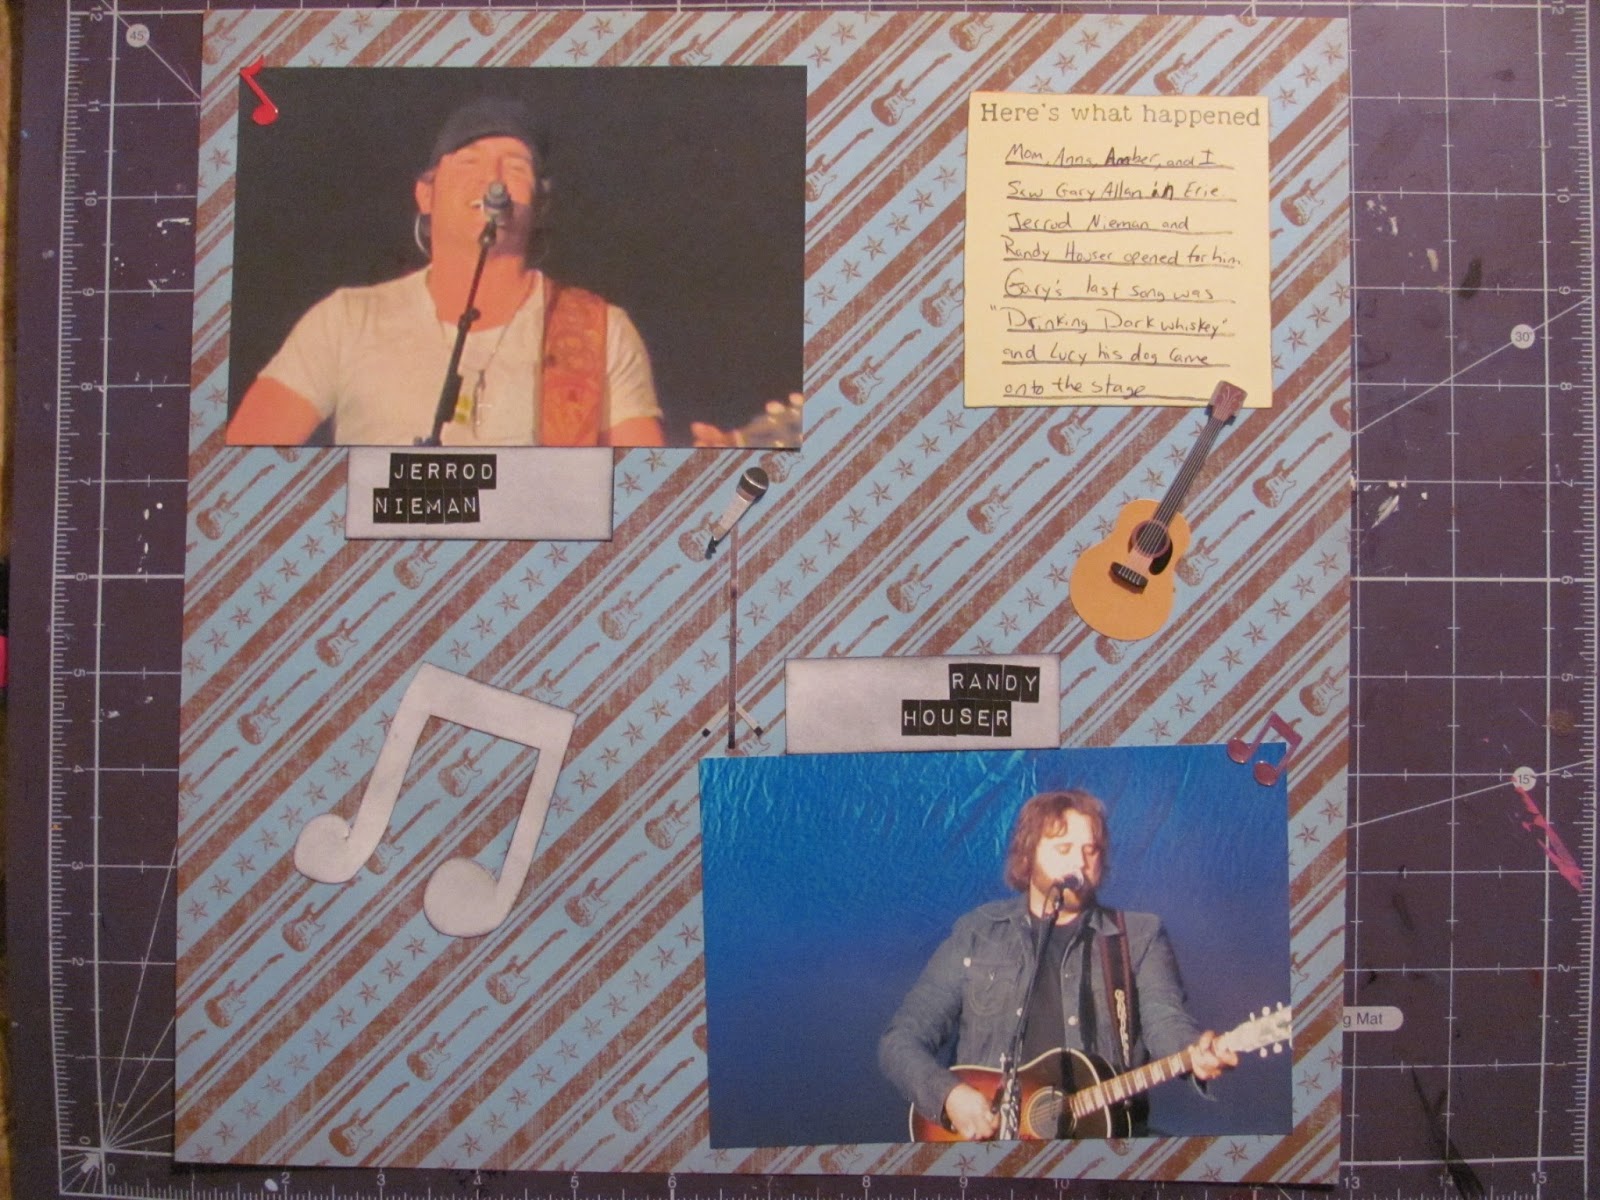 |
| This is the first page. The top picture is of one of the opening acts, Jerrod Nieman and the bottom is of Randy Houser. I used some Tim Holtz alphastickers for the labels that have the artist's name. I used some K & Company stickers and I cut out a a music note out of white cardstock and distressed it with some black Staz On ink. |
 |
| For the second page, I kept it very simple. The Rock Star paper I used kinda makes a frame around the picture so I just put the picture, the ticket, and a K & Company sticker on the page. |
Wednesday, June 19, 2013
Resin Day
Hey everyone. I wasn't feeling very well today so instead of making some clay pieces I'm going to share my resin pieces that I've made. I'm new to resin so they aren't that great but I'm working on it. So here you go.
I hope you all liked taking a look at m resin collection. I'm going to make some more soon but I'm almost out of resin so I'll have to get some more. Tomorrow will be Scrapbook Day again so I'll be continuing my concert series. TTFN Ta ta for now.
 |
| This is the first piece I made. I made several mistakes with this one. I didn't measure the resin properly so it very flimsy. I also didn't use mold release so I had a heck of a time trying to get this out of the mold. The painting is also not that great. So this one is definitely a fail. |
 |
| Next I made these bottle cap charms. These were easy. I used the same resin mix as the lollipop but these are better since the are so small. I put some glitter in each of the caps and used some sticker flakes that I have several of. The bottle caps I used have holes in the top and I didn't notice that until the resin was in and I couldn't figure out why there was resin all over the place. Once I found the holes, I put some hot glue over them and put some more resin in them. |
 |
| I got some silicone heart molds that I kinda went crazy with and made a few pieces using them. This was the first one. It's got some gold glitter in it and then I put a Thomas O'Malley sticker on top. The O'Malley's head kinda flopped up so it's bumpy there. I'll have to figure out how to dome and fix that. |
 |
| I love this one! This is Roquefort. He has some red and gray glitter behind him. He doesn't stick up and he's completely imbedded in the resin. Success! |
 |
| I have some Halloween stickers that allow you to put together a witch so I thought I'd make her and put her in a resin piece. She flopped up like O'Malley and her eye sticker isn't down all the way. I'm going to have to dome this one too. Thee is some blue and red glitter behind her so it looks purple. |
 |
| Lastly, I made this lighthouse. My mom loves lighthouse so I made this for her. It's much better than the lollipop. It's solid, I used mold release, and instead of painting I put some blue and silver glitter in the resin. This is my favorite after Roquefort. |
Tuesday, June 18, 2013
Some Nifty Swappy Things
Hey everyone. Since it's Tuesday, I'm going to share some swap things with you. I have the normal ATCs but I also have some altered pieces and an art journal page. So, onto the swaps.
I'm going to start with the ATCs. I have made some for swaps that are already started and some for swaps that will start later this month.
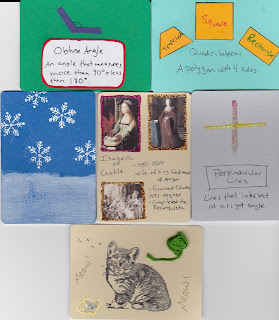 Ok, so I'm going to start from the top and make my way down to the bottom. On the top row are two ATCs for the ABCs of Geometry series. I have an obtuse angle, quadrilateral, and on the second row, you can see the perpindicular lines one. Then on the second row is an ATC for a swap that is called Risk. For this swap, all participants choose one theme that they put in the comments and then when the partners are given, we all look in the comments section to find our partners theme and we make an ATC centered around that theme. My partners theme is snowflakes so I used some embossing powder and stickles for the flakes and then tried out some Tim Holtz crackle paint for the bottom. I love the effect the crackle paint makes so I might have to get some more colors of this stuff. The next ATC is another Strong Women in History ATC and this time it is Isabella of Castile. This is the last one that is up on Swap-bot but I really hope she creates some more since I had so much fun making these. On the last row is an ATC about a day in the life of a cat. I had a little trouble with this one since my cats don't do much. I stamped the cat, made a ball of yarn, put on sticker of a mouse, and wrote "Meow!" and "zzzz" on it.
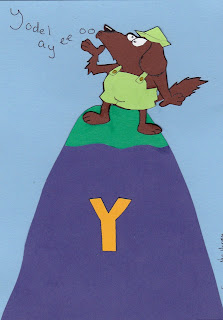 I'll next show you the art journal page. For this swap, we were to make a page using something that began with Y. I actually asked my mom what I should do and she said yodel so I paper pieced this yodeling dog together and put him on a mountain. I wrote the "yodel ay ee ooo" on the top left corner. A requirement for the swap is to have a Y on it so I cut a Y from golden yellow cardstock and glued it to the mountain. That yodeling wolf is so cute.
 On to the altered pieces. I'll start with this art doll. I used this template for the doll. I colored her hair, face, and arms with colored pencils. I used a Hero Arts background stamp for her torso with my Cat's Eye stamps and then used Tea Dye for the distressing. I also wrapped some green string around her waist. For her tail, I used some Zing glittered green embossing powder, that I got on Saturday with the envelope board and stamps, to make her tail look like shiny like a real tail. On her fins, I glued different colors of tissue paper. Makes it look more flowy.
The last swap piece I have to share is an altered DVD case. It's not completed yet but I do have the cover almost done. Here it is.
I used a digital stamp that I found online for the little pencil pixie. I colored her with colored pencils (I don't have any Copics or other markers that allow shading). I put stickles on her wings and glossy accents on the gray part of the pencil. I also made some little flowers using a little circle punch and brown buttons. The background of the cover is cream cardstock that I inked using, yet again, my Cat's Eye inks and various stamps. I also did some doodles. I think the willy nilly way I stamped makes it look like she got a little crazy with her pencils. I also bordered the whole outside of the DVD case with the purple ribbon. I'm going to work on this some more this week so I'll share this again when I get it done.
I have one more project that I wanted to share. It's not for a swap. It's just something I wanted to make. I found this project on YouTube and had to give it a try. I discovered Saturated Canary stamps a few months ago and bought a few of them but haven't used any until today. Not only does Saturated Canary have these awesome stamps, there is also have a YouTube channel that shows great ways to use their stamps. I'm not sure if its Saturated Canary's own channel but this channel does use exclusively their stamps. That's where I found this project. It's not done yet but it's looking good so far so I'd thought I share it anyway.
I'm going to start with the ATCs. I have made some for swaps that are already started and some for swaps that will start later this month.


The last swap piece I have to share is an altered DVD case. It's not completed yet but I do have the cover almost done. Here it is.
I have one more project that I wanted to share. It's not for a swap. It's just something I wanted to make. I found this project on YouTube and had to give it a try. I discovered Saturated Canary stamps a few months ago and bought a few of them but haven't used any until today. Not only does Saturated Canary have these awesome stamps, there is also have a YouTube channel that shows great ways to use their stamps. I'm not sure if its Saturated Canary's own channel but this channel does use exclusively their stamps. That's where I found this project. It's not done yet but it's looking good so far so I'd thought I share it anyway.

I'm using Saturated Canary's Turtle Lurv stamp. She's colored in with colored pencils and then fussy cut her. On the canvas, I Modge Podged some green dotted cardstock and some DCWV paper. Before I put the image on, I painted the background with light green and white paint and then wiped it off so you can still see the patterns on the paper underneath. I then Modge Podged the image and very lightly added some more white paint. I'll work on her some more this week and I'll keep you updated on her progress.
I hope you enjoyed checking out some of the projects I made and am in the process of making. Tomorrow, will be clay day so come back tomorrow to check out what I make. Until then, TTFN Ta ta for now.
Monday, June 17, 2013
Retro OWH
Hey everyone. It's OWH card day again and I have a card to share using Sketch #177. This weeks sketch was very papery so I only made one card. The card I made also follows last week's Midweek Throwdown. I have some wings on the stamped image. Onto the card!

This week's card has a bit of a retro feel to it. With the envelope board, I had ordered Inkadinkado's Vintage Tattoos ink set so I used one of them on this card. It was inked with some inks that are on my Cat's Eye stack. I also stamped the I Love You so that it says "Sweetheart I Love You". I think it would work for the husband, wife, or child (especially a teen). I used some very dark brown cardstock for the bottom paper and then placed the heart and swirls paper. Next is the flowery banner. Some more brown cardstock is under the red dotted paper. I put some black brads on the side of the red paper. Then comes the stamped image that was stamped on white cardstock and then I used the same Cat's Eye stack that I used for the image to put a little color around the image. The sentiment is also using the stack.
I hope you liked the card. I'm really pleased with the way it came out. Tomorrow is going to be swap update. I have some ATCs, a page, and I'm taking a break right now from a altered art piece so hopefully I will have two altered art pieces to show you. Until next time, TTFN Ta ta for now.
Saturday, June 15, 2013
It's Finally Here!
Hey everyone. I got the package I was talking about yesterday and I tested it out today. I ordered it mid-March but due to some technical issues I had to wait a while to get it. But it is finally here and I'll show you it and the final outcome.
 |
| Here it is. It's the We R Memory Keepers Envelope Board. It's a lot smaller than I thought it would be but I guess that makes it easier to store. It comes with a matching bone folder that fits in the side slot. |
 |
| For the test I made an A2 sized envelope so I needed to cut the paper to 8 1/8 by 8 1/8. |
 |
| I had to line it up at 3 3/4 on the top. As you can tell by the photo I got a little confused by the numbers and I actually lined it up at 2 3/4 instead. Once I had it correct I scored the side and then punched. The complete instructions are in the top left corner of the board. |
 |
| Once all done with the scoring and punching, this is what the front of the envelope looks like. |
 |
| And here's the back. As you can tell, the color changed cause I messed up a few times before I got it right. It's still a little small to fit my A2 sized cards but at least it's an envelope. |
Now that I have tested it, I'll review it. It's small so it will be easy to store and I love that it comes with its own bone folder on the side. It was a little confusing to use. I had to try it 3 times to get it right. The ruler was confusing since I'm use to rulers going from left to right and this one goes right to left. I'm going to have play with it a bit more so I can perfect my enveloping. Other than being a little confused by it, it was fun to play with and will be useful for making envelopes for family cards. I won't be using it for OWH cards since that will take a lot of paper to make them because it takes one full 8 1/2 by 11 sheet of cardstock.
So that's it for my WRMKs Envelope Board test and review. I hope to liked it and this has been somewhat helpful. BTW, I ordered it from StampingScrapping. I had ordered other things to go with my board, one of which I will be showing something I made with it on Tuesday. That's it for today. TTFN Ta ta for now.
Friday, June 14, 2013
Cutest Puppy Book
Hey everyone. Today is going to be Mini Album day. I have been working on a mini book of my puppy since I got her a year and a half ago. It's kind of like her puppy book. I had gotten a Pink Paisley album from a Scrapbook.com contest and filling it with Kiely was the best idea. I'm going to show you all the pages I have created so far.
I'm sure I've shared some of these before but I thought I'd share the whole book today. I hope you enjoyed seeing my puppy growing up. She'll be two in August! My how time flies. I'll be back on Monday with another card but there may be an extra this weekend when I get a special package I have been waiting three months for that I'd love to share and do a review of. Can you guess what it is? :) Until then, TTFN Ta ta for now.
 |
| First is the title page. I used my Cricut for the puppy in the corner and for her name. The puppy is on the Create a Critter cartridge and I think the name is on Kate's ABCs. I wrapped some white ribbon around the middle and added a white flower that was inked with pink ink. Not sure what the paper is. I think I got it from Michael's. |
 |
| I also created a page to celebrate her coming to me. This is a picture of her on the way home from the airport. I cut the frame from the Heritage Cricut cartridge and the Delta symbol at the bottom is also cut with the Cricut but I used the Cricut Craft Room to make it. Unfortunately the red part of the symbol fell off so I'll probably draw it in later. The frame is also a pocket the has a journaling tag and the papers that I had to sign to pick her up from the airport. I also tied some red and white ribbon around the holes in the frame. |
 |
| The third page features this adorable picture of Kiely in her sweater. All the cuts are from Create a Critter. I used some old holiday paper that I have that is striped like her sweater. |
 |
| Kiely's first Halloween page is actually the second picture chronologically (you can tell by her ears) but I kind of put it on upside down so had to flip the page over. All the cuts are from the Happy Haunting cartridge. I put some glossy accents on the rats eye and tied some gray string around his tail. I also have a journaling block die cut (sorry but I don't know who's it is). Kiely didn't dress up because she had bronchitis her first Halloween so we put her in a cute little dress. |
 |
| Here's my favorite picture of Kiely. It's my IPod's lock screen photo. I made it a sleepy time theme since she is under the blankets on my bed. Cuts are from Create a Critter. I cut up a Recollections journaling tag to create the journaling block. |
 |
| This is the page I made today. Kiely dressed as a bumblebee for Halloween this last year so it's bee themed. The only Cricut cut on this page is the bee which is on the Kate's ABCs cartridge. I used some Ancestry.com letters that I have had forever. I also used a Cuttlebug embossing folder for the corner block and the journaling tag that I cut in half. |
Thursday, June 13, 2013
Concert Series
Hey everyone. Today is Scrapbook Day again so I'm going to share one of my albums with you. This album has all my concert pictures in it. I'm a little behind on my pages (I'm only to 2010) but I'll work on these pages each week and share them with you until I'm done. That should only be another 3 weeks until this summers concerts start. Onto the pages!

 The last pages are from when I saw Tom Petty and the Heartbreakers. I made these two pages today. Crosby, Stills, and Nash opened for them. Not a CSN fan at all but I could stand them long enough to get to Tom Petty. On the first page I put a couple photos from the Crosby, Stills, and Nash concert. It also includes the ticket and the journaling block.
On the 2nd page is Tom Petty! This is my favorite band so I was so excited to see them. They sang my favorite song "You Don't Know What It's Like To Be Me". I put 3 photos from the concert (the black and white one is from online since I couldn't get any good shots of Tom) and I also put some K & Company stickers on the page. The paper is from the Rock Star stack.
These are all I have done so far. I still have 3 more Gary Allan concerts to do. My mom loves him so we see him a lot. Then my new concert season starts in July. I'll finish some more pages next week. Tomorrow will be Smashbook/Mini Album day. Until then TTFN Ta ta for now.
 |
| The first concert in the album is the first Gary Allan concert. I always put a journaling block on the page to help me remember the event. At this concert, I was given a pick that Gary had used and I put it in a vellum pocket that I made. My mom is so jealous. :) I bordered the ticket with some leather string and matted the photos with brown cardstock. The cowboy on the horse is a part of the paper which came out of the All About Boys DCWV stack. |
 |
| I also saw Jack Hanna live! It was great. I sat in the front row so I could see the animals really good and some of them looked at me. I even almost had the penguin fall into my lap. I matted the cheetah and penguin photo with some paper that I think came from Basic Grey's Max and Whiskers 6X6 pad. I also used some Imaginesce paper for the strips and the lynx is bordered by some green rickrack ribbon. I also included a baby birds in a nest die cut. |
 |
| I also went to a Billy Currington concert. We didn't stay very long so I don't remember it very well. I used some paper from DCWV's Rock Star stack and included the ticket, a wristband, and the journaling block. |

 The last pages are from when I saw Tom Petty and the Heartbreakers. I made these two pages today. Crosby, Stills, and Nash opened for them. Not a CSN fan at all but I could stand them long enough to get to Tom Petty. On the first page I put a couple photos from the Crosby, Stills, and Nash concert. It also includes the ticket and the journaling block.
On the 2nd page is Tom Petty! This is my favorite band so I was so excited to see them. They sang my favorite song "You Don't Know What It's Like To Be Me". I put 3 photos from the concert (the black and white one is from online since I couldn't get any good shots of Tom) and I also put some K & Company stickers on the page. The paper is from the Rock Star stack.
These are all I have done so far. I still have 3 more Gary Allan concerts to do. My mom loves him so we see him a lot. Then my new concert season starts in July. I'll finish some more pages next week. Tomorrow will be Smashbook/Mini Album day. Until then TTFN Ta ta for now.
Subscribe to:
Posts (Atom)